
Table of Contents
- Refreshing No-Cook Lentil Salad with Peaches and Goat Cheese
- Smoky Air Fryer Tempeh Tacos with Fresh Corn Salsa
- Grilled Halloumi and Zucchini Skewers over Herbed Quinoa
- Chilled Soba Noodle Bowls with Edamame and Peanut Lime Dressing
- Instant Pot Summer Ratatouille with Chickpeas
- Bring the Sunshine to Your Table
- Summer Kitchen Queries
Welcome to your kitchen, where the vibrant colors of peak summer produce await your creative touch.
As we step into the warmth of the season, our focus shifts toward light, nourishing ingredients that celebrate the garden bounty.
Today, I will show you how to transform simple vegetables into masterpieces that satisfy the soul and the palate alike.
Mastering the art of the vegetarian dinner requires a balance of textures and a deep understanding of seasoning.
We will explore techniques that bring out the natural sweetness of roasted peppers and the crisp bite of fresh greens.
These recipes are designed to be efficient for busy evenings while maintaining the high culinary standards of a professional kitchen.
Cooking is an act of love, especially when sharing a wholesome meal with those you cherish most.
Whether you are a beginner or a seasoned pro, these dishes offer a chance to refine your skills and nourish your body.
Let us ignite the stove and begin our journey toward a more flavorful, plant-based lifestyle together.
Refreshing No-Cook Lentil Salad with Peaches and Goat Cheese
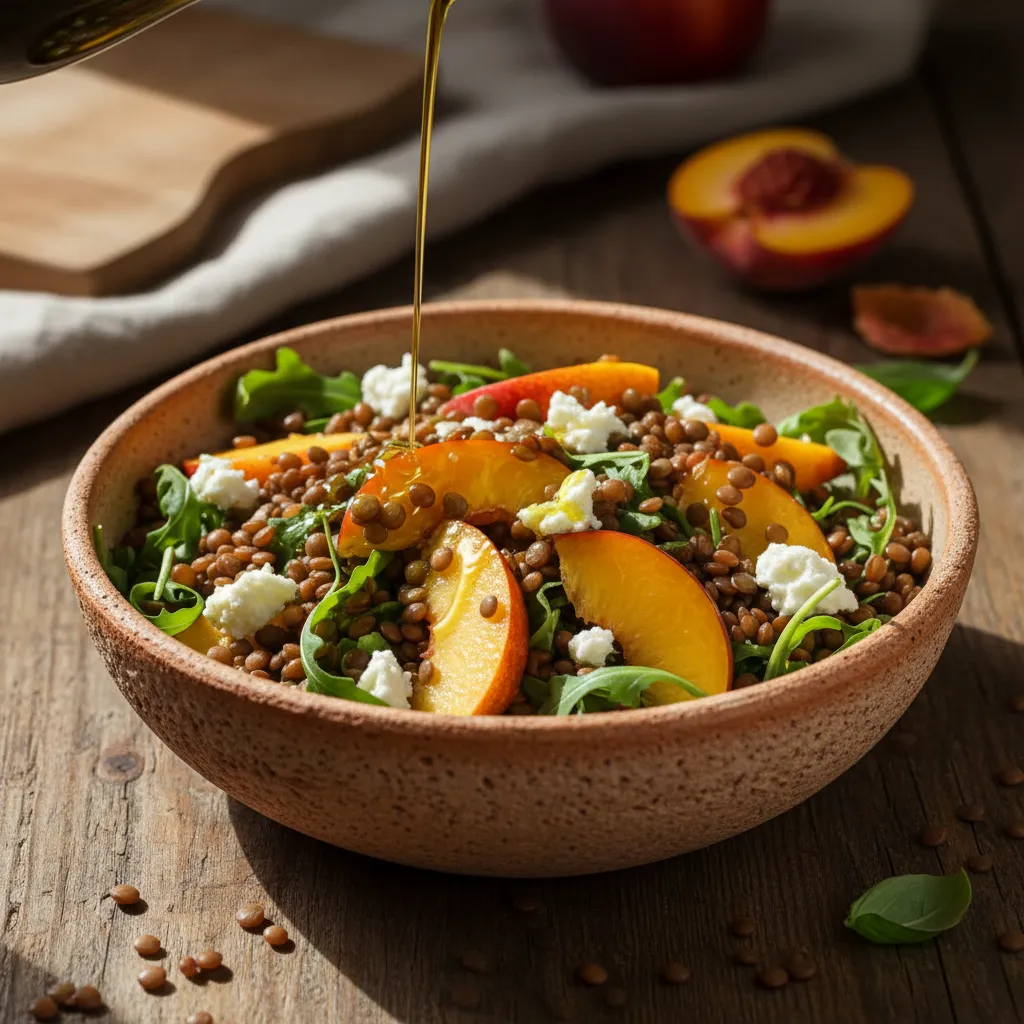
When the temperature rises, the last thing you want to do is turn on the oven. You need a meal that cools you down but still feels substantial.
This salad bridges the gap between sweet summer fruit and savory satisfaction. It uses store-bought cooked lentils to save you precious time.
The earthiness of the lentils grounds the dish perfectly. Meanwhile, the juicy peaches add a burst of floral sweetness that screams summer.
Creamy goat cheese ties everything together with a tangy richness. It creates a symphony of textures that keeps your palate engaged.
If you enjoy this, you will love our collection of salads that save time and beat the heat.
The best summer meals are those assembled, not cooked. Let the fresh produce do the heavy lifting for flavor.
Using canned lentils makes this a ten-minute miracle meal. Just ensure you rinse them thoroughly to remove excess sodium and starch.
Lentils are low in sodium and saturated fat, and high in potassium, fiber, folate, and plant chemicals specifically associated with antioxidant activity.
The Nutrition Source, Harvard T.H. Chan School of Public Health
Ingredients
- 2 cups canned brown lentils, rinsed and drained
- 2 large ripe peaches, sliced into wedges
- 4 cups fresh arugula or baby spinach
- 4 oz soft goat cheese, crumbled
- 0.25 cup toasted walnuts or pecans
- 3 tbsp extra virgin olive oil
- 1 tbsp fresh lemon juice
- 1 tsp honey or maple syrup
- Salt and fresh cracked pepper to taste
Instructions
- Place the arugula in a large serving bowl as the base. Top with the rinsed, dry lentils.
- Arrange the peach slices over the lentils. Scatter the crumbled goat cheese and toasted walnuts on top.
- In a small jar, shake the olive oil, lemon juice, honey, salt, and pepper until emulsified.
- Drizzle the dressing over the salad just before serving. Toss gently to coat without mashing the fruit.
Choosing the right lentil is key for texture. You want a variety that holds its shape well in a salad, rather than turning into mush.
Here is a quick guide to selecting the best pulse for your cold dishes.
| Lentil Type | Texture Profile | Salad Suitability |
|---|---|---|
| French Puy | Firm, peppery flavor | ✅ Excellent |
| Brown/Green | Soft but holds shape | ✅ Good (Standard) |
| Red/Yellow | Soft, disintegrates | ❌ Poor (Best for soup) |
| Beluga (Black) | Firm, caviar-like | ✅ Excellent |
This dish proves that plant-based eating is never boring. For more inspiration, check out our vegetarian recipes that are packed with flavor.
Feel free to swap the peaches for nectarines or even strawberries. The versatility of this base allows you to use whatever produce is peak season.
Summer Salad Secrets
- Flavor infusion: Canned lentils are convenient but can taste plain. Toss them with half the dressing and let them sit for 15 minutes before assembling to ensure every bite is zesty.
- Meal prep hack: To pack this for lunch without sogginess, layer ingredients in a mason jar: dressing on the bottom, followed by lentils, peaches, cheese, and finally the arugula on top.
- Texture check: If your peaches are a bit too soft, cut them into larger chunks rather than thin wedges so they don’t disintegrate when tossed.
Smoky Air Fryer Tempeh Tacos with Fresh Corn Salsa

Summer evenings call for meals that are light yet satisfying. This recipe perfectly balances smoky depth with fresh crunch, making it a standout choice for warmer weather.
Using an air fryer ensures the tempeh gets crispy without heating up your entire kitchen. It is the ultimate hack for maintaining a cool home while cooking a hot meal.
Tempeh offers a nutty texture that holds up beautifully in tacos. Unlike tofu, it has a firm bite that mimics traditional meat fillings when prepared correctly.
If you love exploring flavors like this, you might also enjoy our collection of quick and easy Tex-Mex recipes.
The key here is the marinade. We use smoked paprika and cumin to infuse the plant-based protein with a savory richness that pairs perfectly with the sweetness of fresh corn.
Tempeh is a fermented soy product that serves as a versatile source of vegetarian protein. Its firm texture allows it to hold its shape well in stir-fries and soups.
Academy of Nutrition and Dietetics, Soy Foods
We pair the smoky protein with a zesty corn salsa. This garnish adds a burst of acidity and sweetness that cuts through the savory notes of the main dish.
Great summer cooking is about maximum flavor with minimal heat in the kitchen.
Ingredients
- For the Tempeh:
- 8 oz (225g) tempeh, cut into small cubes
- 2 tbsp soy sauce or tamari
- 1 tbsp olive oil
- 1 tsp smoked paprika
- 1/2 tsp ground cumin
- 1 tbsp maple syrup
- For the Corn Salsa:
- 1 cup fresh corn kernels (raw or lightly grilled)
- 1/4 cup red onion, finely diced
- 1 jalapeño, seeded and minced
- 1/4 cup fresh cilantro, chopped
- 1 tbsp fresh lime juice
- Salt to taste
- For Serving:
- 6 small corn tortillas, warmed
- Sliced avocado (optional)
Instructions
- Prepare the Tempeh: If your tempeh tastes bitter, steam the cubes for 5 minutes first. Whisk together soy sauce, olive oil, smoked paprika, cumin, and maple syrup in a bowl.
- Marinate: Toss the tempeh cubes in the marinade until fully coated. Let it sit for at least 15 minutes to allow the flavors to infuse deeply into the protein.
- Air Fry: Preheat your air fryer to 375°F (190°C). Arrange the tempeh in a single layer in the basket. Cook for 10 to 12 minutes, shaking the basket halfway through.
- Make the Salsa: While the tempeh cooks, combine the corn, red onion, jalapeño, cilantro, lime juice, and salt in a medium bowl. Mix well to combine the flavors.
- Assemble: Warm your tortillas. Fill each one with a generous portion of the crispy tempeh. Top immediately with the fresh corn salsa and slices of avocado.
This dish is best served immediately while the tempeh is crisp. The contrast between the warm filling and the cool salsa creates a delightful sensory experience.
To help you decide on your cooking method for the night, consider how the air fryer compares to a traditional oven during the hot summer months.
| Feature | Air Fryer | Traditional Oven |
|---|---|---|
| Preheat Time | 3-5 Minutes | 10-15 Minutes |
| Kitchen Temperature | Stays Cool | Raises Ambient Heat |
| Texture Result | Extra Crispy | Baked/Roasted |
| Energy Usage | Low | High |
Pair these tacos with one of our refreshing iced tea recipes to cool you down for a complete patio dining experience.
Chef’s Secrets for Perfect Tacos
- To maximize flavor absorption, steam your tempeh for 5 minutes before marinating; this opens the pores and removes any lingering bitterness for a cleaner taste.
- For the ultimate crunch, ensure your tempeh cubes are arranged in a single layer with space between them; overcrowding the basket leads to steaming rather than crisping.
- Give your salsa a smoky upgrade by quickly charring the corn kernels in a dry pan for 2 minutes before mixing to complement the smokiness of the tempeh.
Grilled Halloumi and Zucchini Skewers over Herbed Quinoa
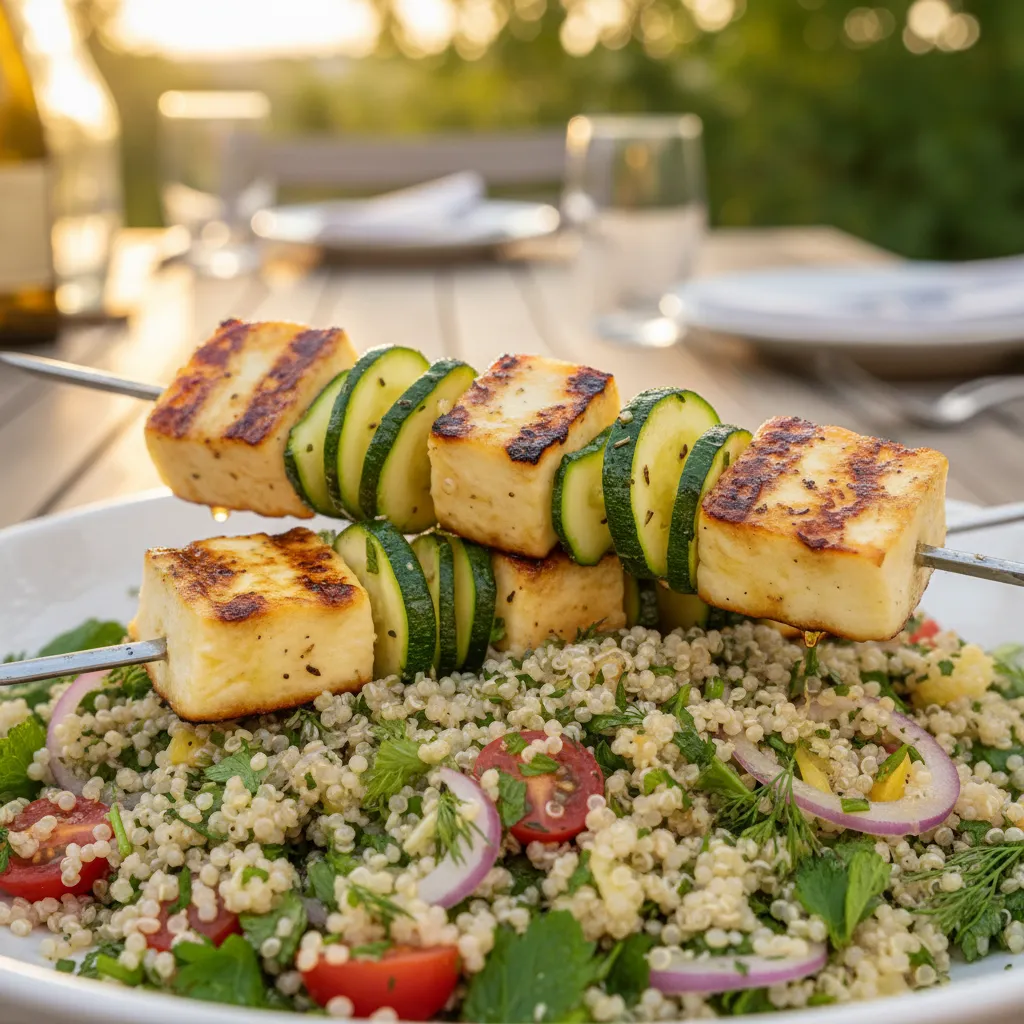
Halloumi is often called the king of grilling cheeses. It holds its shape beautifully over an open flame.
The salty, squeaky texture of the cheese contrasts with the tender, sweet zucchini. It creates a satisfying bite every time.
This dish relies on fresh, vibrant ingredients. It is perfect for a light evening meal on the patio.
Serving this over quinoa adds a nutty, wholesome base. It turns the skewers into a complete, protein-packed dinner.
If you enjoy these flavors, you will love our flavor-packed Mediterranean recipes.
Summer dinners should be vibrant, easy, and full of texture. This dish delivers on all fronts.
The herbed quinoa soaks up the juices from the skewers. A squeeze of lemon ties everything together.
Ingredients
- Halloumi cheese: 2 blocks (8 oz each), cut into 1-inch cubes
- Zucchini: 3 medium, sliced into thick rounds
- Quinoa: 1 cup, rinsed well
- Vegetable broth: 2 cups
- Olive oil: 3 tbsp, divided
- Lemon juice: 2 tbsp, plus wedges for serving
- Fresh mint: 1/4 cup, chopped
- Fresh parsley: 1/4 cup, chopped
- Dried oregano: 1 tsp
- Salt and pepper: To taste
Instructions
- Cook the quinoa: Combine quinoa and broth in a pot. Bring to a boil, cover, and simmer for 15 minutes.
- Fluff and season: Remove quinoa from heat. Let it sit for 5 minutes. Fluff with a fork and stir in herbs, lemon juice, and 1 tbsp oil.
- Prep the skewers: Thread alternating pieces of halloumi and zucchini onto wooden skewers.
- Season skewers: Brush the skewers with the remaining olive oil. Sprinkle with oregano and black pepper.
- Grill: Heat your grill to medium-high. Cook skewers for 2-3 minutes per side until the cheese has grill marks.
- Assemble: Spread the herbed quinoa on a platter. Top with the hot skewers and serve immediately with lemon wedges.
Cooking halloumi requires high heat. You want to sear the outside quickly before the inside becomes too soft.
Because of its high melting point, halloumi can be fried or grilled.
The Spruce Eats, What Is Halloumi Cheese?
For an extra kick, add a pinch of chili flakes. The heat cuts through the richness of the cheese perfectly.
You can also swap the zucchini for bell peppers. Red onions are another great addition for sweetness and crunch.
Why This Combo Works:
- Texture: Crisp zucchini meets chewy, savory cheese.
- Flavor: The salty halloumi balances the nutty, mild quinoa.
- Freshness: Mint and parsley lift the entire dish.
- Nutrition: It provides a complete protein source without meat.
If you are looking for more meat-free inspiration, check out these vegetarian recipes that are packed with flavor.
Grill Master Secrets
- Soak wooden skewers in water for at least 30 minutes before grilling to prevent them from charring or catching fire over the high heat.
- Pat the halloumi cubes dry with a paper towel before brushing with oil; removing surface moisture helps achieve those iconic, crispy golden-brown grill marks.
- For even more depth, toast the dry quinoa in the pot for 2 minutes until it smells nutty before adding your vegetable broth.
Chilled Soba Noodle Bowls with Edamame and Peanut Lime Dressing
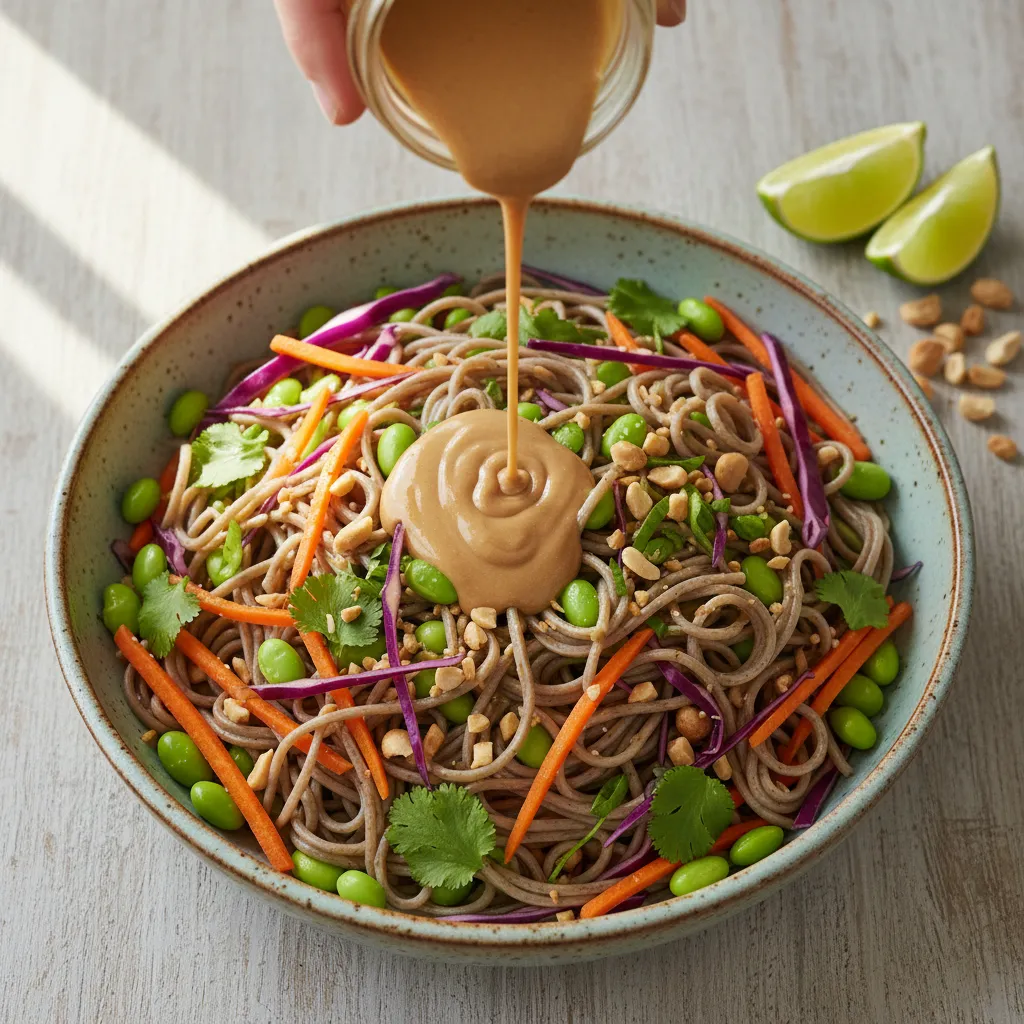
When the temperature rises, standing over a hot stove is the last thing you want. Chilled noodles are the perfect solution for sweltering evenings.
Buckwheat soba offers a nutty, earthy flavor that pairs beautifully with zesty citrus. It provides a refreshing escape from heavier winter meals.
This dish relies on fresh crunch and savory depth. The creamy peanut dressing clings to the noodles, delivering umami in every bite.
If you are looking to expand your rotation of meat-free Monday recipes, this bowl is a top contender.
Edamame adds a substantial protein boost without weighing you down. It keeps the meal light yet satisfying for a family dinner.
Cool down your palate with the nutty elegance of soba and the bright zing of fresh lime.
Ingredients
- Noodles: 8 oz dried buckwheat soba noodles (check labels for gluten-free if needed)
- Protein: 1.5 cups frozen shelled edamame, thawed
- Crunch: 1 cup red cabbage, thinly shredded
- Vegetables: 2 medium carrots, julienned or spiralized
- Fresh Herbs: 1/2 cup fresh cilantro, chopped
- Base: 1/3 cup creamy peanut butter (unsweetened)
- Acidity: 2 tbsp fresh lime juice
- Salty/Savory: 3 tbsp soy sauce or tamari
- Sweetness: 1 tbsp maple syrup
- Aromatics: 1 tsp fresh ginger, grated
- Liquid: 2-4 tbsp warm water (to thin dressing)
Instructions
- Boil the Noodles: Bring a large pot of water to a boil. Add the soba noodles and cook according to the package directions, usually 4-5 minutes.
- The Ice Bath: Drain the noodles immediately. Rinse them vigorously under cold running water for 30 seconds to remove excess starch. This prevents clumping.
- Make the Dressing: In a small bowl, whisk together peanut butter, lime juice, soy sauce, maple syrup, and grated ginger.
- Adjust Consistency: Slowly add warm water, one tablespoon at a time, whisking until the sauce reaches a pourable, creamy consistency.
- Assemble: In a large mixing bowl, toss the chilled noodles with half the dressing to coat them evenly.
- Combine: Add the edamame, cabbage, carrots, and cilantro. Drizzle with the remaining dressing and toss gently.
- Serve: Plate immediately, garnished with extra lime wedges or sesame seeds if desired.
Soba noodles are delicate. Handling them correctly during the rinsing process is the secret to that perfect, al dente texture.
To get the best texture, you need to wash the noodles in cold water, rubbing them with your hands to remove the slime/starch.
Namiko Chen, Just One Cookbook
You can easily customize this bowl based on what is in your fridge. It is a fantastic way to use up leftover crispy vegetables.
Below is a guide to balancing the flavors in your dressing if you decide to experiment with different ingredients.
| Flavor Profile | Primary Ingredient | If It Tastes Too Flat… | If It Tastes Too Intense… |
|---|---|---|---|
| Creamy/Fat | Peanut Butter | Add a drop of sesame oil | Dilute with warm water |
| Acid/Zest | Lime Juice | Add rice vinegar | Add more maple syrup |
| Salty/Umami | Soy Sauce | Add a pinch of salt | Add more peanut butter |
| Heat | Fresh Ginger | Add Sriracha or chili flakes | Add a splash of coconut milk |
This meal also works wonderfully as a meal-prep option. Store the dressing separately to keep the vegetables crisp until lunch.
Noodle Mastery
- To ensure a silky and non-gummy texture, massage the soba noodles gently under cold running water during the rinse to scrub away every bit of excess starch.
- If you are prepping this ahead of time, toss the rinsed noodles in a teaspoon of toasted sesame oil; it adds an aromatic depth and prevents the strands from sticking together.
- For an extra layer of texture, top your bowl with crushed roasted peanuts or toasted sesame seeds just before serving to provide a satisfying crunch against the creamy dressing.
Instant Pot Summer Ratatouille with Chickpeas
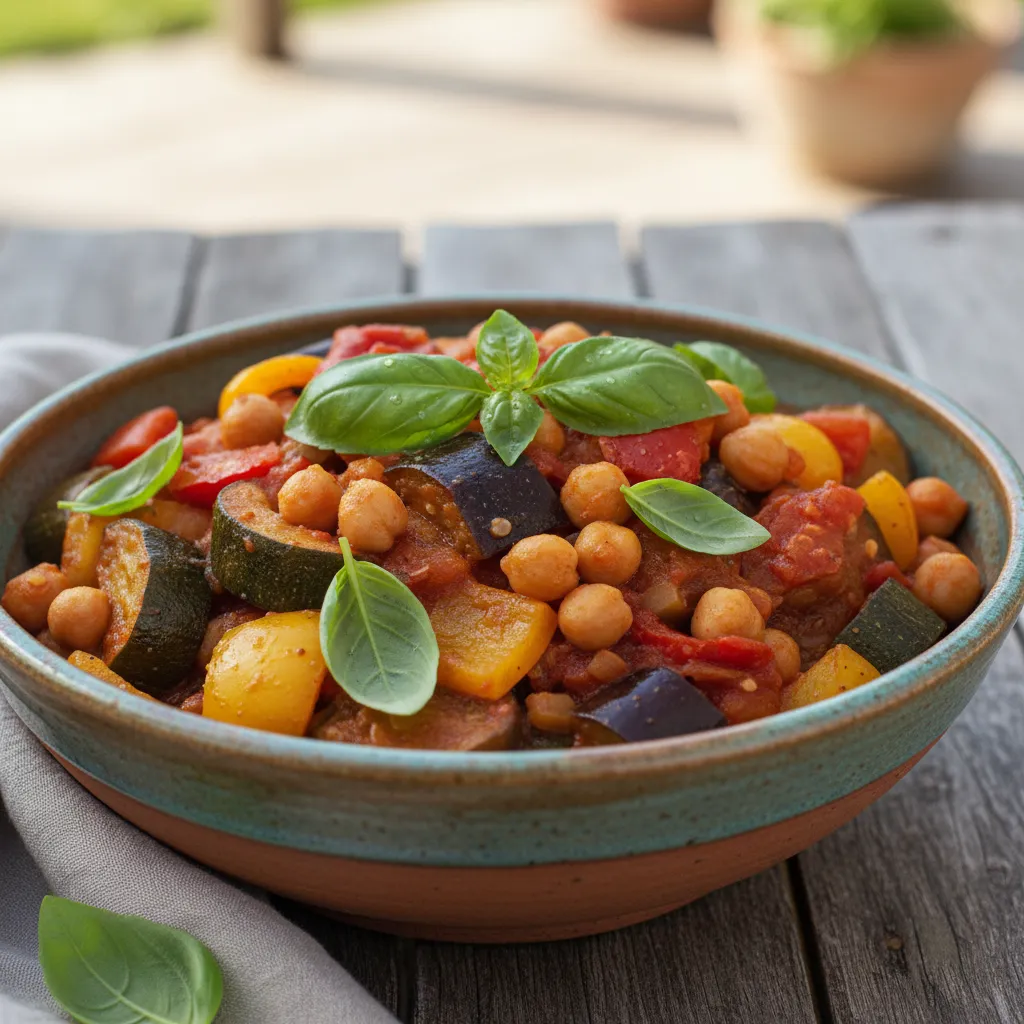
This dish captures the essence of a Provencal summer garden in a fraction of the time. Traditional ratatouille requires slow simmering, but the pressure cooker locks in flavor instantly.
We enhance the classic vegetable medley with chickpeas for satisfying plant-based protein. The result is a rich, stew-like consistency that tastes as if it cooked all day.
The secret lies in cutting the vegetables into large chunks. This prevents them from turning into mush under pressure, ensuring a texture that is tender yet distinct.
If you open a new can for this recipe, check out our ideas for What to Do with Leftover Tomato Paste to avoid waste.
Summer cooking should be about vibrant flavors and minimal effort. Let your pressure cooker do the heavy lifting while you enjoy the sun.
Ingredients
- 2 tbsp extra virgin olive oil
- 1 medium onion, chopped
- 3 cloves garlic, minced
- 1 medium eggplant, cubed (1-inch pieces)
- 2 medium zucchini, sliced into half-moons
- 1 red bell pepper, largely diced
- 1 yellow bell pepper, largely diced
- 1 can (15 oz) chickpeas, drained and rinsed
- 1 can (28 oz) diced tomatoes, undrained
- 2 tbsp tomato paste
- 1 tbsp dried herbs de Provence
- 1 tsp salt, plus more to taste
- Fresh basil for garnish
Instructions
- Turn your Instant Pot to the “Sauté” setting. Heat the olive oil and cook the onion for 3 minutes until softened but not browned.
- Add the garlic and tomato paste. Stir constantly for 1 minute until fragrant. This blooms the flavors before pressure cooking.
- Layer the vegetables in this order: peppers, eggplant, zucchini, and chickpeas. Pour the diced tomatoes and their juices over the top.
- Sprinkle with herbs de Provence and salt. Do not stir. This prevents the “Burn” notice by keeping the thick sauce off the bottom.
- Secure the lid and set the valve to “Sealing”. Select “Manual” or “Pressure Cook” on High Pressure for 2 minutes.
- Once the timer beeps, perform a Quick Release of the pressure. Remove the lid carefully and stir gently to combine the layers.
- Let the stew sit for 5 minutes to thicken slightly. Serve warm, garnished generously with fresh chopped basil.
Vegetarian eating patterns have been associated with improved health outcomes including lower levels of obesity, a reduced risk of heart disease and lower blood pressure.
Academy of Nutrition and Dietetics, Building a Healthy Vegetarian Meal
This meal pairs beautifully with crusty bread to soak up the juices. Try serving it alongside our Quick & Easy Sourdough Focaccia for a complete feast.
Ratatouille tastes even better the next day. The flavors meld together in the fridge, making it an ideal candidate for meal prep lunches.
Chef’s Garden Secrets
- To prevent a ‘Burn’ warning, ensure the tomato paste is well-incorporated with the onions, then layer the watery vegetables like zucchini and tomatoes on top without stirring before sealing.
- If you prefer a thicker, more concentrated sauce, turn the ‘Sauté’ function back on for 3-5 minutes after pressure cooking to reduce the liquid to your desired consistency.
- Add a splash of balsamic vinegar or a squeeze of fresh lemon juice just before serving to brighten the earthy flavors and balance the sweetness of the bell peppers.
Bring the Sunshine to Your Table
Summer dining shouldn’t mean sweating over a hot stove. These vegetarian recipes prove that flavor comes from fresh ingredients, not hours of heat.
Whether you choose the tangy lentil salad or another vibrant dish, remember to balance textures. Crisp greens and juicy fruits are your best friends.
Don’t be afraid to swap ingredients based on what looks best at the farmers market. Cooking is an art, and nature provides the best palette.
Gather your loved ones, pour a cold drink, and enjoy these nourishing meals. Here is to health, happiness, and delicious summer nights!
Summer Kitchen Queries
Canned beans, chickpeas, and hard-boiled eggs are effortless additions. For a crunch, sprinkle in hemp seeds or toasted almonds just before serving.
Absolutely! The lentils marinate beautifully in the dressing. However, add the peaches and arugula right before serving to keep them fresh and crisp.
Nectarines or apricots make wonderful substitutes. Even grilled watermelon works well with goat cheese for a savory-sweet twist.
Most are easily adaptable. For the lentil salad, simply swap the goat cheese for a dairy-free feta or avocado chunks to maintain that creamy texture.